This tutorial is about using PyCharm IDE on a Windows machine to remotely execute Python 2.7 programs on Raspberry Pi. Despite my best efforts, I could not find a step by step tutorial on how to remotely connect PyCharm to Raspberry Pi and use the Raspberry Pi python interpreter to execute the programs. So I’m listing out the steps here. This tutorial is tested on a Windows 10 machine and Raspberry Pi running Raspbian OS.
Step 1: Ensure the Windows Machine and Raspberry Pi are part of the same Network.
Step 2: Install PyCharm Professional Edition on your Windows machine.
Step 3: You need to get the IP Address of Raspberry Pi. To do so, open the Terminal window on raspberry pi and type the following command ifconfig
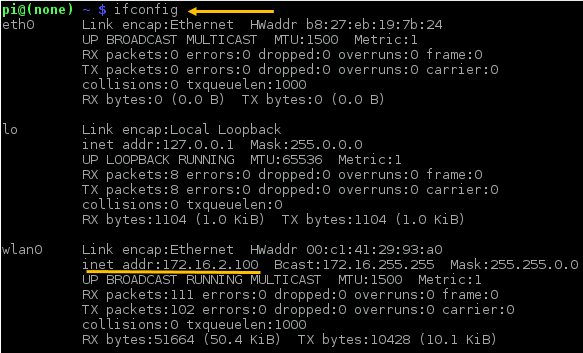
As can be seen from the screenshot, Raspberry Pi is connected to the Wireless LAN and the address is 172.16.2.100. It may vary on your Raspberry Pi. Make a note of this address.
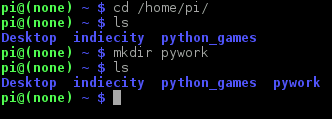
Step 4: Once you have obtained the Address, go to your home directory and create a folder as shown in the below screenshot. This folder is used to store the Python programs.
Step 5: Invoke your PyCharm IDE. Create a new Project. Go to File —> New Project —> Pure Python —> Give a Project Name. In my case it is RaspberryPiProject.
Step 6: Right Click on RaspberryPiProject and select New —> Python File and give a name to python file. In my case it is rasp.py
Step 7: Write the line print “Hello RaspberryPi” in the editor.
Step 8: Now go to File —> Settings
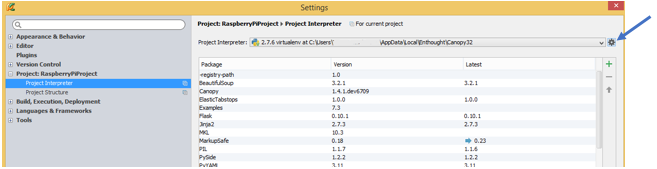
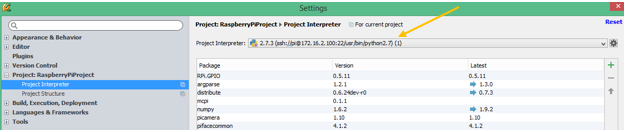
On the left pane of the window you should see Project:RaspberryPiProject. (If you have given a different name then it may differ from what is displayed here) Expand it and Click on Project Interpreter
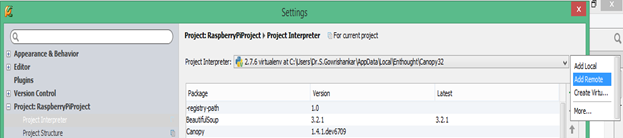
On the right pane of the window, click at the end of Project Interpreter and select Add Remote option as shown below.
A Remote Python Interpreter window pops up.
Step 9: Configure the Remote Python Interpreter window.
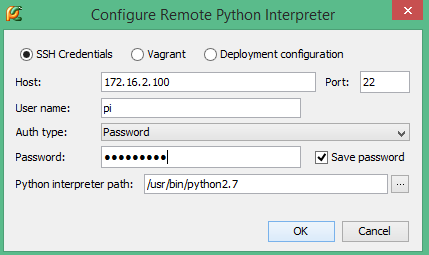
Write the IP address of the Raspberry Pi you earlier made note of in the Host option. Give the user name and password. Specify the Python interpreter path on raspberry pi. Click OK. Now you should see the Python Interpreter found in Raspberry Pi.
Step 10: Now go to Tools —> Deployment —> Configuration and click on + sign on the left pane. You should see a window.
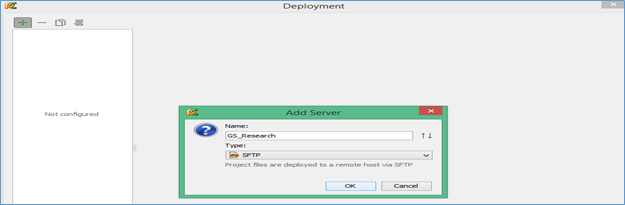
At this stage Raspberry Pi will be treated as a Server machine. Give a name to your Raspberry Pi server (in my case it is GS_Research) and select the type as SFTP and click OK
Step 11: Click on the Connections tab and specify the IP address of the Raspberry Pi again in SFTP host
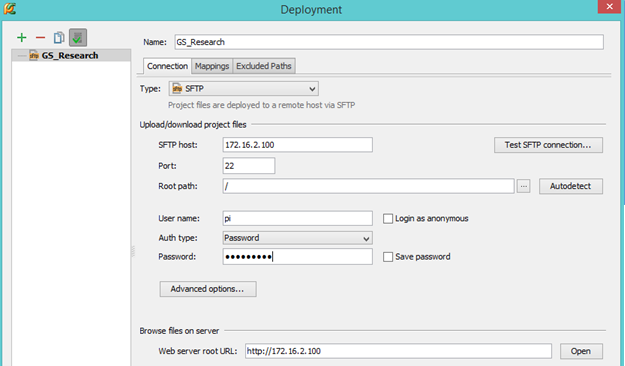
Leave the port and Root path as it is. Specify the User Name and Password
Then click on Mappings tab.
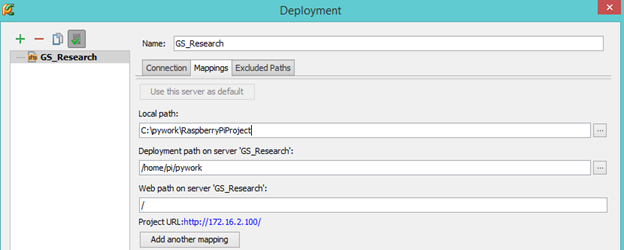
Specify the local path where you have stored the python project in the Windows machine. Then specify the path which we had created to store the Python programs on raspberry pi i.e., /home/pi/pywork and click OK.
Step 12: Now we need to upload the Python file created on a Windows machine on to Raspberry Pi and compile the program using Raspberry Pi Python Interpreter.
Go to Tools —> Deployment —> Upload to GS_Research.
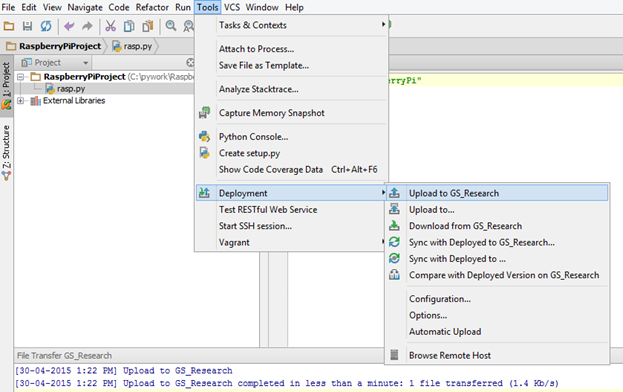
Remember, here GS_Research is the name given to the Raspberry Pi server. At the bottom pane, you can see that the file is successfully uploaded.
Now open the terminal window again on the Raspberry Pi and go to the path where you intended to store Python programs. If you have followed the instructions then the path is /home/pi/pywork. You should see the rasp.py file in there.
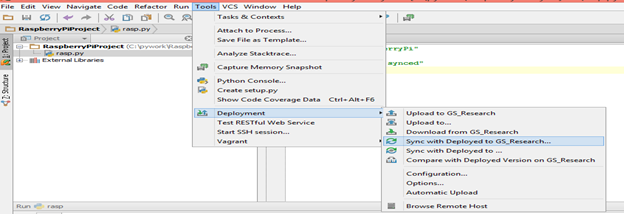
Step 13: You need to sync the Python code with Raspberry Pi as and when you write your code in PyCharm. To do that go to Tools —> Deployment —> Sync with Deployed to GS_Research.
Happy Coding…
Comments
comments powered by Disqus